3. Deploying Instant Messaging for OWA
A new feature in Exchange 2010 is the integration of Instant
Messaging (IM) into Outlook Web App, so your OWA users can see who is
online and directly chat with the users without the requirement of
installing Office Communicator on their client computer.
Note:
IM
integration for OWA does not require a UM server role to be installed
in your environment; it just requires OCS 2007 R2 to be available. For
that reason the feature also does not require an Exchange E-CAL like UM
does.
To deploy this functionality, you
need to install the OCS 2007 R2 Web Service Provider on all Client
Access servers, enable IM on the Client Access server, and configure
the OCS 2007 R2 Server to be able to access the Client Access server.
For IM integration you need the following:
The Firewall
configuration between the OCS 2007 R2 and Client Access server needs to
allow the following TCP ports: 5061 (SIP), 5075, 5076, and 5077.
The
Client Access server requires a digital certificate that includes the
FQDN or Client Access server array name as Subject Name and is from the
same CA as the certificate of the OCS server. Certificates from
different CAs—even if the CAs are trusted—might cause problems.
You must perform the following steps on every Client Access Server role where users access OWA and want to use IM:
Download the Microsoft Office Communications Server 2007 R2 Web Service Provider at http://go.microsoft.com/fwlink/?linkid=135129 and run CWAOWASSPMain.msi to extract the package:
Run vcredist_x64.exe to install Microsoft Visual C++ 2008 Redistributable.
Run Ucmaredist.msi to install the OCS 2007 R2 Unified Communication Managed API 2.0 Core Redistributable.
Run CWAOWASSP.msi to install the OCS 2007 R2 Web Service Provider.
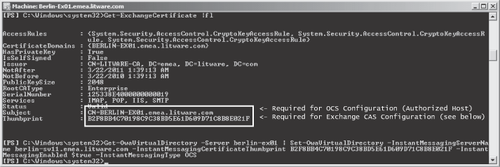
Identify the Client Access server's certificate subject name and thumbprint using the Get-ExchangeCertificate |fl cmdlet.
Configure the OWA Virtual Directory of the Client Access server to enable IM by running the Get-OwaVirtualDirectory
–Server | Set-OWAVirtualDirectory
–InstantMessagingServerName -
InstantMessagingCertificateThumbprint
-InstantMessagingEnabled $true – InstantMessagingType OCS cmdlet, as shown in Figure 2.
Note:
In Exchange 2010 RTM this task required modifying web.config file located in the \ClientAccess\Owa
folder. If you have not installed Exchange 2010 SP1 yet, please follow
the instructions to configure the web.config file at http://technet.microsoft.com/en-us/library/ee633458.aspx.
Restart
World Wide Web Publishing Service to apply the changes. Remember,
restarting the service will disconnect all active users.
After you have configured the Client Access Server role, you need to perform the following steps on your OCS 2007 R2 Server:
In the Office Server 2007 R2 Management Console, on your OCS 2007 R2 pool, open Front-End properties.
On
the Host Authorization tab, click Add Authorized Host and configure the
Client Access Server or the Client Access Server namespace. In
Settings, select Throttle As Server and Treat As Authenticated, as
shown in Figure 3.

Note:
The
Server name must be exactly the same as the Subject name of the
certificate you have configured on your Client Access server(s).
For the settings to take effect immediately, you need to restart Office Communication Server Front-End service. Be aware that this will disconnect any active users.
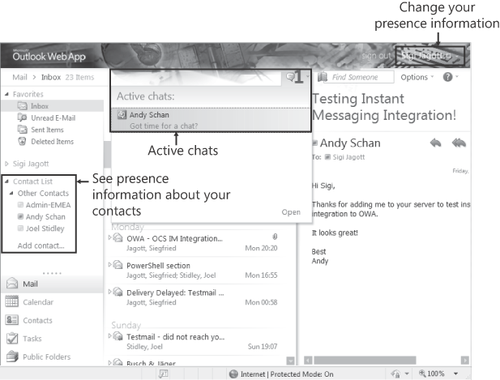
After you've configured
your OCS 2007 R2 and Client Access Server role, your users should see
their presence information and should be able to chat with their
contacts using OWA as shown in Figure 4.